The Manage User Accounts screen allows you, to look up user accounts in your district, edit the information attached to those accounts, add new accounts, import users, and export users.
1. Finding Users
2. Deactivating Users
3. Editing Existing Users
4. Editing post (promoted student)
5. Adding New Users
6. Importing a Large Group of Users
7. Exporting User Accounts
1. Finding Users
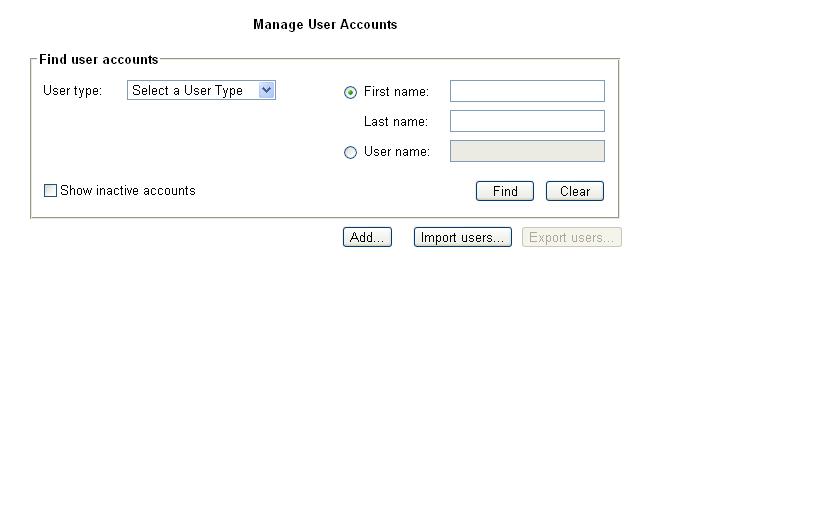
- Select the type of user that you are looking for by using the User type drop-down box.
- Select a school from the School drop-down box.
- If you would like to include accounts that have been deactivated, click the Show inactive accounts checkbox.
- If you are looking for a specific user account...
- If you know a student's name, you can click the radio button next to the First Name field. Type the student's first name in the First Name field. Type the student's last name in the Last Name field. (These fields are optional.)
Note: While using both the first and last name will find a specific user, you do not need to use both fields. You can fill in just one field and search by that alone. For example, you can enter just the last name 'Smith' and find all students or teachers with that last name.
- If you know a student's user name, you can click the radio button next to the User Name field. Type the student's user name in the User Name field. (This field is optional.)
- To view a list of student accounts that match the selected criteria, click the Find button.
Note: If you have not filled in the First, Last, or User Name fields, clicking the Find button will bring up a list of all of the selected user types in the selected school.
- To reset the user type filters, click Clear.
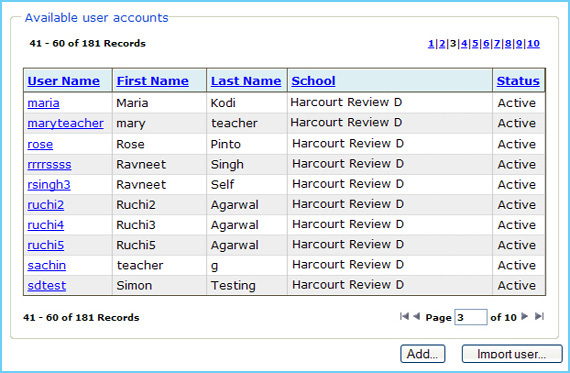
- Click one of the column heads to re-sort the list of users by that category.
Note: You can sort the list alphabetically by the students' User Name, First Name, Last Name, School, or Status.
- To edit a selected user's account information, click on that user's user name.
- To add a new user, click the Add button.
- To add multiple users at one time, click the Import User button.
- Often, the list of results may be longer than can be displayed on one screen.
Note: The system only shows 20 results at a time. If the list of results contains more than 20 entries, the system will create additional results pages. To see additional results pages if there are more than 20 users on the screen, use the Page field located below the results table.
- To move forward one page, click the single right arrow next to the Page field.
- To move backward one page, click the single left arrow next to the Page field.
- To go straight to the last results page, click the right arrow with a line next to the Page field.
- To return to the first results page, click the left arrow with a line next to the Page field.
- To jump straight to a specific page in the results table, type the number of the page you want to go to into the Page field and hit Enter on your keyboard.
- You may also jump straight to a specific page in the results table by clicking the appropriate number in the list on the right-hand side above the results table.
Back to Top
2. Deactivating Users
- Find the user that you want to deactivate.
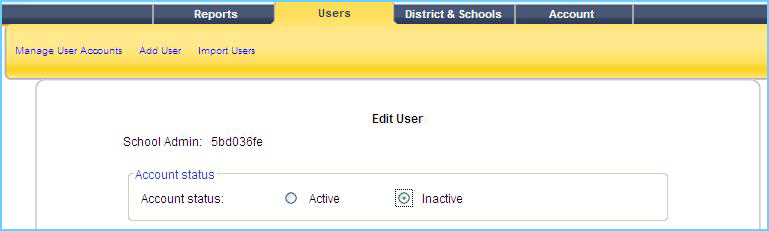
- On the Edit User screen, click the Inactive radio button in the Account status area.
- Click Save.
- Read the message that appears, and click OK. You return to the Manage User Accounts screen.
Notes
If the user being deactivated is a student flagged for Soar to Success:
A message tells you that the students record and assignments in Soar to Success will be deleted.
The Soar to Success flag is removed from the students record.
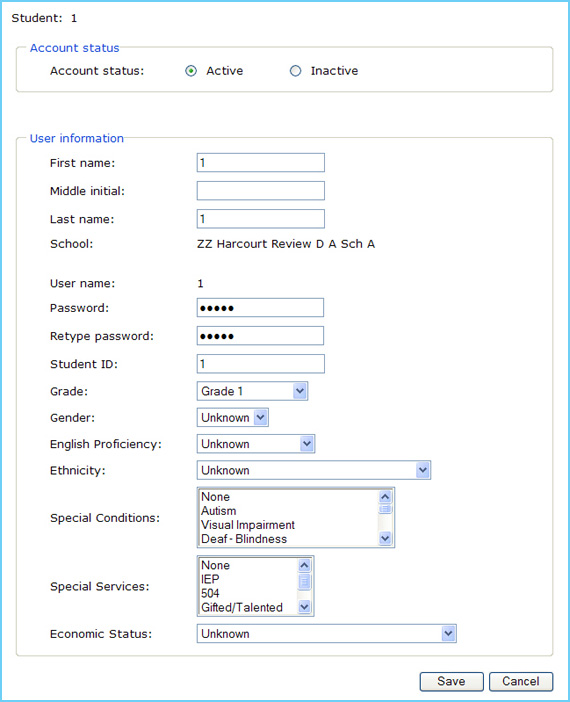
- Click on the name of the user account you want to edit in the table. This will open a new screen.
Note: The screen will appear slightly different for each of the possible user types (student, teacher, school administrator, and district administrator). The example below shows a student account page. Differences in what appears on the screens for other account types will be noted.
- To change the status of the account from active to inactive, or vice-versa, select the appropriate radio button in the Account Status area.
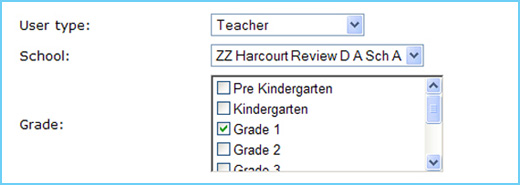
- To change the grade affiliated with a teacher user, select one of more grades in the Grade field.
Note: The Grade field will only appear on teacher accounts.
- To change the user's title, select the correct title from the Title drop-down box.
Note: This selection does not appear on the Student user account page.
- To change the user's first name, type the new name in the First name field.
- To change the user's middle initial, type the new initial in the Middle initial field.
- To change the user's last name, type the new name in the Last name field.
- The user's School is pre-set and cannot be changed.
Note: The school field will not appear for the District Administrator account type.
- To change the user's email address, type the new e-mail address in both the Email address field and the Re-type email address field.
Note: E-mail addresses are not collected for student accounts.
- The user's name is pre-set and cannot be changed.
- To change the user's password, type the password in both the Password field and the Retype password field.
- To change a student's ID number, type the ID number in the Student ID field.
Note: This field only appears on the edit student account screen.
- To change a grade, select the appropriate grade level from the Grade drop-down box.
Note: This field only appears on the edit student account screen.
- To change a student's gender, select the appropriate choice from the Gender drop-down box. (This field is optional.)
Note: This field only appears on the edit student account screen.
- To change a student's proficiency with English setting, select the proper level from the English Proficiency drop-down box. (This field is optional.)
Note: This field only appears on the edit student account screen.
- To change a student's ethnicity, select the proper grouping from the Ethnicity drop-down box. (This field is optional.)
Note: This field only appears on the edit student account screen.
- To select any special needs or learning considerations for a student, select the appropriate conditions in the Special Conditions field.
Note: This field only appears on the edit student account screen.
- To select any special services offered for a student, select the appropriate services in the Special Services field.
Note: This field only appears on the edit student account screen.
- To change a student's economic status, select the proper level from the Economic Status drop-down box. (This field is optional.)
Note: This field only appears on the edit student account screen.
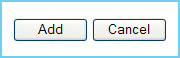
- To save the user's new information, click the Save button.
- To exit the screen without saving any of your changes, Click the Cancel button.
Back to
Top
4. Editing post (promoted student)
- On the Users tab, click Manage User Accounts.
- On the Manage User Accounts screen, select the User type on the dropdown list under Find user accounts. As you are editing a student’s user account, select Student.
- You can also enter the First name, Last name, or User name.
- Click Find.
- If you have not entered the First, Last, or User name, clicking Find will show a list of all the students in your school.
- Click a student’s User Name in the Available user accounts area.
- Select the promoted grade from the Grade dropdown list.
- Click Active radio button in the Account Status area.
- You can update the other fields as required.
- If you save the update without changing the status to Active, you will receive an error message.
- Click Save.
- Click OK on the message that appears. The student’s record is updated.
- You return to the Manage User Accounts screen.
Note
To activate the student’s account, select an active grade level within the school and then select the Active option at the top of the screen.
Back to
Top
- To add a new user account to the system, click the Add button on the Manage Users screen.
Note: The add user screen will appear slightly different for each of the possible user types (student, teacher, school administrator, and district administrator). Differences in what appears on the screens for the different account types will be noted.
- To create a new account, select the proper user type that you would like to create from the User type drop-down box. As a district administrator, you can add student, teacher, school administrator, and other district administrator accounts.
- Select a school to place the user in from the School drop-down box.
Note: The School drop-down box does not appear for District Administrator accounts.
- Select one or more grades to affiliate a teacher account with by clicking on the appropriate grade levels in the Grade field.
Note: The Grade field only appears for teacher account types.
- Enter the salutation for the account holder using the Title drop-down box.
Note: The Title drop-down field does not appear for student accounts.
- Enter the user's first name in the First Name field.
- Enter the user's middle initial in the Middle Initial field. (This field is optional.)
Note: This field will only hold one character or letter.
- Enter the user's last name in the Last Name field.
- Enter an email address for the user's account in the Email address field.
Note: Email addresses are not collected for student accounts.
- Type the same email address for confirmation in the Retype email address field.

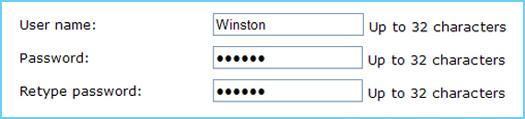
- Enter a unique user name for the account in the User Name field.
- Enter the password for the user's account in the Password field.
Note: Passwords must be 5 - 32 characters in length.
- Type the same password for confirmation in the Retype Password field.
- This is the name and password that the user will use to log in to the system, so make sure you make note of the information.
- This is all the information that is required for teacher, school administrator, and district administrator accounts.
- All of the following fields only appear for the creation of student accounts.
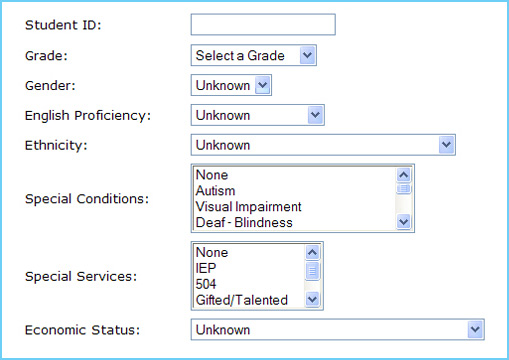
- If your school has individual student ID numbers, you can enter that information in the Student ID field. (This field is optional.)
- Select the student's grade using the Grade drop-down field.
- The following six fields are related to the No Child Left Behind (NCLB) demographic categories. These categories are all optional, but they may be needed for some filters or operations in the system, such as running a performance report against these NCLB categories.
For example, if a student is not marked
as a male or female here, they will not show up on reports run against male or female filters elsewhere.
- Select the student's gender using the Gender drop-down field.
- Select the student's proficiency with English using the English Proficiency drop-down field.
Note:
The choices for the English Proficiency field are English Proficient, Beginner, Early Intermediate, Intermediate, Early Advanced, and Advanced.
- Select the student's ethnicity using the Ethnicity drop-down field.
Note: The choices for the Ethnicity field are American Indian/Alaskan Native, Asian, Black or African American, Hispanic or Latino, Native Hawaiian or other Pacific islander, White, and Other.
- Select any special conditions that the student might have using the Special Conditions field.
Note: The choices for the Special Conditions field are None, Autism, Visual Impairment, Deaf - Blindness, Developmental Delay, Hearing Impairment, Orthopedic Impairment, Multiple Disabilities, Mental Retardation, Emotional Disturbance, Speech and Language Disorders, Specific Learning Disabilities, Other Health Care Needs, and Traumatic Brain Injury. You may select more than one option by holding down the Control (Ctrl) key on your keyboard and clicking on multiple options.
- Select any special educational services that the student may be receiving using the Special Services field.
Note: The choices for the Special Services field are None, IEP, 504, Gifted/Talented, Migrant Education, and Title I. You may select more than one option by holding down the Control (Ctrl) key on your keyboard and clicking on multiple options.
- Select the student's economic status using the Economic Status drop-down field.
Note: The choices for the Economic Status field are Not Economically Disadvantaged, Eligible for Free Lunch Program, Eligible for Reduced-price Lunch Program, and Economically Disadvantaged by Other Criteria.
- To save the user's data and create the new account, click the Add button.
- To exit the screen without saving any of your changes, Click the Cancel button.
Back to
Top
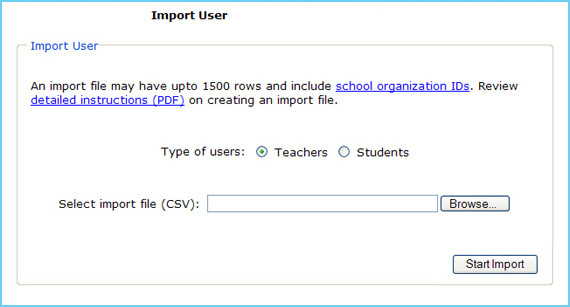
6. Importing a Large Group of Users
- You have the ability to add multiple student or teacher accounts at one time. You can import these accounts by using an existing file.
- To find the ID numbers of the schools in your district, click on the school organization IDs link. These ID numbers are important because they will tell the system which school to place your users in during the upload process.
- To view more detailed instructions on how to create a user import file, click the Detailed Instructions (PDF) link above the file input field.
Note:
This document, in PDF format, will provide in-depth instructions on how to create and correctly format a file that will allow you to import large numbers of users at one time.
- To select what type of user accounts you are creating, select the appropriate radio button in the Type of users area.
- To import a group of teachers to the system, select the radio button to the left of the word Teachers.
- To import a group of students to the system, select the radio button to the left of the word Students.
- To locate the import file that you have created, click the Browse button.
Note: The Browse button will bring up a standard file browsing window. Navigate to the location of the file on your hard drive or network, click on the file, and click the 'Open' button to select the file.
- After you have located the file you would like to import, click the Start Import button to begin the procedure.
- You will receive a message letting you know once the upload is finished and if the import of users was successful.
Back to
Top
7. Exporting User Accounts
- Click Accounts on the Home page, click the Users tab, and then click Manage Users.
- On the Manage User Accounts screen, select either Teacher or Student from the User Type dropdown list, and then select a school from the School dropdown list.
- You can enter additional data, if available, such as First Name and Last Name, or User Name, and then click Find..
- When the search results are displayed, click the Export users button, on the lower left of the screen.
- When the File Download message appears, click Save.
- In the Save in box, select where you want to save the file and click Save.
- When the Download Complete box appears, click Open, and then double-click the file name. The file opens as a *.csv file.
|