A list of all of the assignments you have made is available for review and tracking. You can filter assignments to view just those that meet selected criteria, preview the assignments that have been made, and delete assignments that have not yet started. You can also edit assignments, copy assignments, and change the order of questions in an assignment.
1. Finding Assignments
2. Reviewing Assignments
3. Making New Assignments
4. Editing Assignments
5. Copying Assignments
6. Changing the Order of Questions in an Assignment
7. Administrator's Assignments
8. Viewing Soar to Success Content
9. Assigning Soar to Success Resources
10. Accessing Soar to Success Assignments
1. Finding Assignments
- On the View Assignments screen, in the Find Assignments area, enter the dates in the From and To boxes, or click the calendar and select the dates.
- On the dropdown lists (optional), you can select a Class, Subject, and Student.
- The View Assignments screen shows the assignments within the date range.
- The list of assignments includes assignments for classes that have been archived in the promotion process.
- Each assignment has View, Delete, Copy, View Progress, Results & Prescriptions and View Intervention links as appropriate to the assignment type.
- You can select the Show only tests check box to search only for tests that contain tests.
- Click Find to start your search, or click Clear to reset the search filters.
 Notes
The Due Date field searches the dates that assignments were due, not the dates that the assignments were prepared or if the assignments were ongoing during this period.
If a specific student is selected, a View Student Test link will display next to each assessment. You can click this link to view that student’s test results.
Back to Top
2. Reviewing Assignments
- To view an assignment, click View in the subject’s row.
- To delete an assignment, click Delete in the subject’s row , read the message that appears, and then click OK.
- To view the progress of an assignment, click View Progress.
To view results and prescriptions of an assignment:
- Click the Results & Prescriptions link to view test results and any recommended remediation.
- To view and assign prescriptions for a student, click the button next to the student’s name, and then click View & Assign Prescriptions.
- In View Class Results & Prescriptions screen, you can find Student Activities, Teacher Activities, view a different student’s prescriptions, or view prescriptions based on another standard set.
- Click Back to Class Results to navigate to View Class Results & Prescriptions screen.
To enter scores:
- In View Class Results & Prescriptions screen, click the button that is next to a student’s name, and then click Enter Scores.
- On the View Tests screen, click the button that is next to the student’s name, and then click Score.
- On the Score screen, enter your score for the assignment.
To show answers:
This option allows the teacher to provide access permission to the students to view the answers. This option is available only if the assignment is associated with an assessment.
- In the Assignments screen, under Show Answers column, click Yes
to allow students to view the answers.
 Notes
You can click one of the column heads to re-sort the list of assignments by that category.
You can sort the list bySubject, Assignmentname,Due Date, Student Count, or Status.
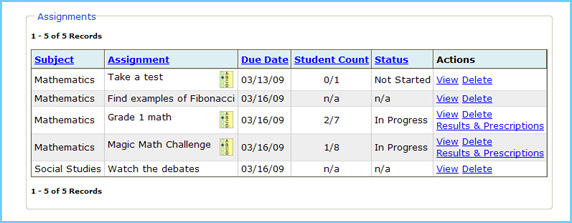
The Subject column shows what subject the assignment was for.
The Assignment column lists the name of the assignment and show an icon if that assignment contained an assessment.
The Due Date column shows when the assignment was due.
The Student Count column shows how many students have completed and submitted the assignment compared to how many students were issued the assignment. If seven (7) students were given an assignment and three (3) have completed it, the display will read 3/7.
The Status column shows if the assessment resource has been started by any students in the class (Not Started or In Progress), if the assessment resource has been completed by the class or passed its available due date (Completed), or if the assignment did not contain an assessment resource (N/A).
Deleting an assignment, will remove the assignment from the student’s To-Do List.
In View Class Results & Prescriptions screen, you cannot schedule or assign any prescriptive resources.
Back to Top
3. Making New Assignments
- To create a new custom assignment using classroom resources that are outside of the system itself (such as television, model building, lab experiments, or essay papers), click the Add Assignment button.
- To create an assignment using the assessment resources already contained within the system, click the Add Test button.
Back to Top
4. Editing Assignments
- On the View Assignments screen, perform one of the following actions:
- If the assignment that you want to edit is displayed on the screen, click Edit.
- If you want to find a specific assignment, enter the search criteria, click Find, and then click Edit for a specific assignment.
- If you want to edit an assessment assignment, click Show only tests and then click Edit on the assignment you want.
- On the Edit an Assignment screen, if you want to select a group, click the Group field, and select the group you want. Alternatively, click OK to go to the next step.
- If you select a group, a message appears, indicating that the available students list is populated with the students in the group only. Click OK.
- All the students in the class or group are now displayed in the Students Available list. Edit the fields that you want.
- When you have completed all the mandatory fields, click Save.
- If the assignment that you edited is an assessment assignment, a message appears displaying Saved and submitted work will be deleted. Click OK.
- If a student has been removed after starting an assignment, the Test in progress message appears. Click OK to return to the Edit an Assignment screen.
Back to Top
5. Copying Assignments
- On the View Assignments screen, perform one of the following actions:
- If the assignment that you want to copy is displayed on the screen,click Copy.
- If you want to find a specific assignment, enter the search criteria, click Find, and then click Copy for a specific assignment.
- If you want to copy an assessment assignment, click Show only assessment and then click Copy on the assignment you want.
- The Make an Assignment screen displays the source assignment information, which has been copied to the new assignment. Click the Class field, and select a class. You may also select a group, if appropriate.
- All the students in the class or group that you selected are displayed in the Students Available list. Add data to the appropriate fields.
- When you have completed all the mandatory fields, click Save.
- The assignment that you have copied is saved as a new assignment, and the View Assignments screen is displayed.
Back to Top
6. Changing the Order of Questions in an Assignment
The Randomize Questions feature allows you to change the order of questions each time a student takes a test.
- On the Assignments tab, click Add Test.
- On the Add Test page, enter the details of the test.
- To change the order of questions, select the Randomize Questions check box.
- Click Save.
Note
If you want to change the order of questions on a test that you have already created, you can do so by clicking Randomize Questions Checkbox on the Edit Test page.
Back to Top
7. Administrator's Assignments
- To view assignments that have been created by an administrator, click the Administrator’s Assignment(s) link on the View Assignments screen.
- In the Actions column, click Assign to assign one of these assignments to your students.
- On the Add Test screen, enter the details
Back to Top
8. Viewing Soar to Success Content
You can view Soar to Success from the Resources tab, or from the Assignments tab.
- To view Soar to Success from the Resources tab:
- On the Resources tab, click Search.
- On the Search screen, select Soar to Success from the Resources dropdown list, and then click Find.
- To view Soar to Success from the Assignments tab:
- On the Assignments tab, click Add Assignments.
- Select Searchable Resources on the Add dropdown list, and click Go.
- On the Search screen, select Soar to Success from the Resources dropdown list, and then click Find.
- In both cases, the Schedule and Assign screen shows a list of Soar to Success resources. On the Assign tab, click a resource link. ThinkCentral sends a request to Soar to Success, and Soar to Success opens the resource. Click the controls on the Teacher Model Player to view the complete resource.
Back to Top
9. Assigning Soar to Success Resources
- On the Schedule and Assign screen, click the Assign tab.
- Select the check box for to the Soar to Success resource that you want.
- Scroll down and click Assign.
- You can assign only one Soar to Success resource at a time. If you try to assign another resource, a message informs you that this is not possible.
- On the Add Assignment screen, ThinkCentral disables the Add dropdown box and the Go button in the Student information area, since you cannot add more resources to the assignment.
- In the Assignment information area:
- Select the assignment details such as Class, Subject (optional), and Group (optional).
- Select the students from the Available students list, and click Add to add them to the Students in assignment list. You can click Add All to add all the students.
- Click Save, and then click OK on the message that appears.
- Think Central determines the Soar to Success status of each student, and sends a request to Soar to Success for the new assignment with the relevant details.
- Soar to Success determines that the class and students are registered, and if the students are already assigned to an existing skill thread. It then shows a list of students assigned to an existing skill thread.
- Clear the check box(es) for student(s) that you do not want to reassign to the new assignment, and then click Save.
- On the Assignment Confirmation screen, click Close Soar to Success.
Back to Top
10. Accessing Soar to Success Assignments
You can access Soar to Success assignments from the Resources tab, or from the Assignments tab.
- On the Resources tab, on the View Resources screen, scroll down through the product list, and click Soar to Success for the subject you want. You can use the Find command in your browser to find Soar to Success more quickly.
- On the Assignments tab, on the View Assignments screen, under Assignments on the left, click the Soar to Success Assignment(s) link.
- If you have one active Soar to Success class, the Class Overview screen appears.
- If you have more than one active Soar to Success classes, the Manage Classes screen opens in a new window, showing all your active Soar to Success classes.
- If you do not have any active Soar to Success classes, the Manage Classes screen appears, with no classes. Click Add Class(es) on the lower right to add one or more classes.
To view and manage the student’s current and pending Soar to Success assignments, take the following steps:
- On the Manage Classes screen, click the Soar to Success class name.
- On the Class Overview screen, click the student’s name
Back to Top |