Because teachers often want to utilize offline resources like television, newspapers, novels, or model building, the system allows you to create custom assignments for your classes utilizing resources located outside of the ThinkCentral system. Custom assignments are saved to the student's to-do list.
1. Title Information & Instructions
2. Assignment Information
3. Add Students
4. Add Custom Resource
5. Edit Custom Resource
6. Delete Custom Resource
7. Display Custom Assignment
8. Preview Assignment
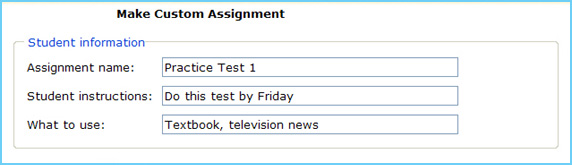
1. Title Information & Instructions
- Type in the name of the custom assignment, in the Assignment Name entry field.
- Enter instructions for students to follow to complete the assignment, in the Student instructions entry field.
- Enter the non-system resource that the student will need use in order to complete the assignment in the What to use entry field. (This field is optional.)
Back to Top
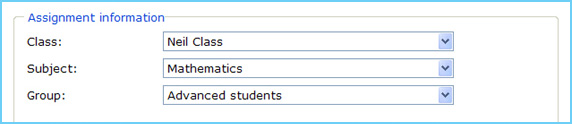
2. Assignment Information
- Select a class from the Class drop-down list.
- Select a subject from the Subject drop-down list.
- Select a group from the Group drop-down list. (This field is optional.)
Back to Top
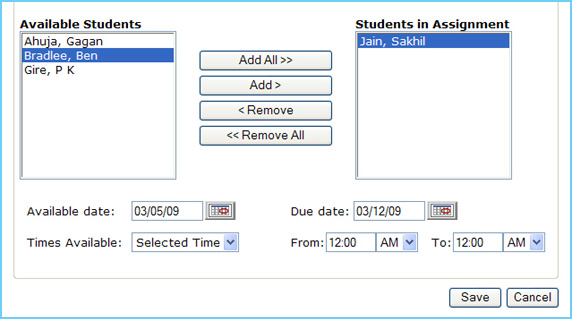
3. Add Students
- Assignments can be made to individuals, groups, or the entire class. Select the students who may receive the custom assignment.
- To Add Students to the Students in Assignment field:
- To give the assignment to all of the students on the Available Students list, click the Add All button.
- To give the assignment to individual students, select the student(s) that you want to add from the Available Students list on the left of the screen. Then click the Add button.*
- To Remove Students from the Students in Assignment field:
- To remove all of the students from the assignment, click the Remove All button.
- To remove individual students from the assignment, select the student(s) that you want to remove from the Students in Assignment list on the right of the screen. Then click the Remove button.*
- Select the custom assignment's available, or start, date by clicking the calendar icon and choosing a date.
Note: The system will automatically set the start date as the day the assignment is made if no other date is selected.
- Select the custom assignment's due date by clicking the calendar icon and choosing a date.
Note: The system will automatically set the due date as one week from the day the assignment is created if no other date is selected.
- Select the time of day that the assignment is available for students to access from the Time Available drop-down list. (This field is optional.)
Note: Your choices in the drop-down box, are 'Any Time' and 'Selected Time.'
- If the 'Any Time' option is selected, then students can take the assignment at any time of day during the assignment period.
- If the ‘Selected Time' option is selected, the ‘From' and ‘To' entry fields must be filled in to indicate the time students can access the assignment.
- To save the custom assignment to the student's to-do list, click the Save button.
- To exit the screen without saving any of your changes, click the Cancel button.
* You can select more than one student by holding down the Control (Ctrl) key on your keyboard (the Apple key if you are using a Mac computer) and clicking on multiple students. You can also click on one student, then hold the Shift key, and click on a second student to highlight all of the students between those two students.
Back to Top
4. Add a Custom Resource
- Click Assignments on the Home page, and then click the Make Custom Assignment button, which is at the bottom of the View Assignments screen.
- On the Make Custom Assignment screen, click Add Resources.
- On the Resource Type dropdown list, select either Text Only or URL.
- Enter data in the Text Description field, or type the URL that you want to use. If you have entered a URL, you can enter additional information in the Link Text field. Click Save, and then click OK on the message that appears.
- On the Make Custom Assignment screen, the new custom resource is displayed at bottom of the Custom Resources List. Under Assignment information, enter the appropriate data in the Class, Subject, and Group fields.
- In the Available Students box, select the students, and click Add>. To add all the students on the list, click Add All>>.
- Enter the Available date, Due date, and Time Available, and then click Save.
Back to Top
5. Edit a Custom Resource
- On the Custom Resource(s) list, click Edit on the resource that you want to change. The Edit Custom Resource screen displays the custom resource that you selected. Make the changes that you require, and then click Save.
Back to Top
6. Delete a Custom Resource
- On the Custom Resource(s) list, click Delete on the resource that you want to delete. When the message asking Are you sure you want to delete this resource? appears, click Yes.
Back to Top
7. Display a Custom Assignment
- In the Student Information section on the View Custom Assignment screen, click the hyperlink to the assignment. This is displayed in blue, underlined text. The custom assignment opens as a web page in a new browser.
Back to Top
8. Preview a Custom Assignment
- Before saving the custom assignment, click Preview on the Make Custom Assignment screen, and then click the link to the assignment.
Back to Top
|